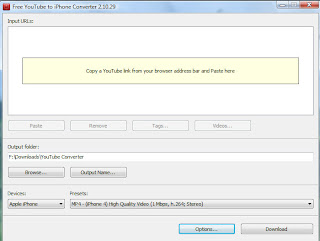
By the end of this post, you will be able to download your favorite YouTube video, convert it for iPhone or iPod viewing, get it into to your iTunes Library and sync it to your iPhone or iPod--Jailbroken or NOT. Best part, once you have the software installed, this only takes a few simple steps. As always, it's my favorite price, FREE.
Yeah yeah, we all know about MxTube for Jailbroken iDevices available in Cydia. MxTube is a great Jailbreak App, but myself and others have had issues with MxTube losing videos during updates and upgrades. Not to mention, your average iPhone or iPod Touch user has no reason to Jailbreak thier iPhone or iPod. Saving YouTube videos is simply not a good enough argument.
I understand there may be several ways to do this, I just want to keep this simple and free. Feel free to comment after the post with your own recommendations.
As always, read the entire post BEFORE you do this at home.
Step 1: Click here to download and install "Free YouTube to iPhone Converter" from dvdvideosoft.com to your PC.
A nice tutorial is provided, but I will provide a brief one based on my experience with the program.
This is free software so it will ask you to install crap you don't need. When you get to this step during installation, uncheck this junk:
Step 2: Once you have installed the program, go ahead and launch it. You can change the default output folder if you wish, or just leave it. I prefer to change mine.
Step 3: Click the Options" button and ensure there is a check mark in the box in front of both "auto paste URLs from clipboard"and "add output files to new iTunes Playlist". Click "OK"
Step 4: I am using a 3GS, and I leave the presets "Apple iPhone" & "MP4 (P"iPhone 4) High Quality" My videos play back perfectly. Tweak this setting if you have any play back issues.
Step 5: Leave the converter program running. Now jump online and browse to YouTube and find your favorite video. Below the video image, click on the "SHARE" button. The web address to the video will be highlighted.
Step 6: Right click the highlighted URL and select "Copy". This will add the video location to the converter program. You can continue adding files to the program by repeating this step on more videos.
If you followed my tutorial properly, once the downloaded, an iTunes window will automatically pop up listing the video or videos you just converted. They will be added to a playlist named "New Playlist 1/29/2011"[current date]. The video or videos will also be permanently located in the "Movies" section of your iTunes Library.
Step 8: Connect your iDevice to iTunes, click on and drag the file or files you just created over to your device, iTunes will now add the videos to your iDevice
Step 9: Remember, this is free software, upon exiting you will get the following screen, just uncheck everything, wait a few seconds and then select "Close". This is the only con I found in this program.
It really is that easy!!!
And that's how Bruce T does it.


No comments:
Post a Comment